
Overloaded Piece in Chess: 3 Steps to Winning Tactics
An overloaded piece in chess has defensive jobs that it cannot fulfil at the same time. The opportunity appears when answering one threat forces that piece to abandon something more important.
The key word is incompatible. A queen defending two pieces is not automatically overloaded. You need a forcing move that makes those responsibilities conflict, and you must calculate what happens when the opponent refuses to cooperate.
Use the three-step method below: list the duties, create a forcing demand, and verify the final position. A concrete board example shows how a rook can be unable to recapture a queen because it must prevent checkmate.
Table of Contents
Table of Contents
🔍 Step 1: identify the overloaded piece’s defensive duties
Before searching for combinations, inspect the defender’s most important pieces. Which one protects a loose queen or rook? Which one guards an invasion square? Is the same piece doing both jobs?
A duty can be less obvious than defending material. A rook might keep the enemy queen off the back rank. A bishop might prevent a knight fork while also protecting a pawn. A queen might be the only piece able to stop a mating threat.
Describe the relationship in one sentence: “This rook protects the queen on d7 and prevents a rook invasion on e8.” That is more useful than saying the position looks tactical. It tells you what a forcing move must exploit.
Then check whether the duties can be transferred. Another defender may be able to protect one target, or the queen may escape with check. Finding two jobs identifies a candidate overloaded piece in chess; it does not yet prove that a combination works.
🎯 Step 2: create a demand the defender cannot ignore
Search for checks, captures and direct threats against one of the responsibilities. A forcing move can deny the defender the time needed to rearrange its pieces.
Sometimes you capture a defended piece because the apparent recapture would allow mate. Sometimes you sacrifice on one square to draw the defender away from another. In other positions, a threat against the queen forces a response that leaves a rook unprotected.
Move order is essential. If you begin with a slow attack, the opponent may solve both problems with one move. Check whether an intermediate move makes the demand more urgent before you start the main exchange.
Do not confuse overloading with a simple double attack. In a double attack, you threaten two targets. In an overload combination, a defender’s incompatible responsibilities explain why it cannot meet the threats. Both ideas can occur in the same position.
✅ Step 3: verify the result, including the refusal
Calculate the natural response first, then look for the opponent’s least cooperative reply. Can the defender decline the capture, give check, exchange your queen or move both the king and a threatened piece out of danger through a forcing sequence?
Count the material after the sequence settles. A move may win a pawn rather than a piece, or produce a winning position without forcing mate. Give the result its correct description instead of stopping at the most attractive moment.
Also inspect your own back rank and loose pieces. A defender that appears tied down may be able to abandon its duties because it has an even stronger threat against your king.
A useful question is: “What precisely prevents the recapture?” If you cannot answer with a legal continuation and a clear outcome, you have found a promising pattern rather than a verified tactic.
♟️ An overloaded piece in chess: the queen and back-rank example
In this teaching position, White has a king on g1, queen on d5 and rooks on d1 and e1. Black has a king on g8, queen on d7, rook on d8 and pawns on f7, g7 and h7. It is White to move.
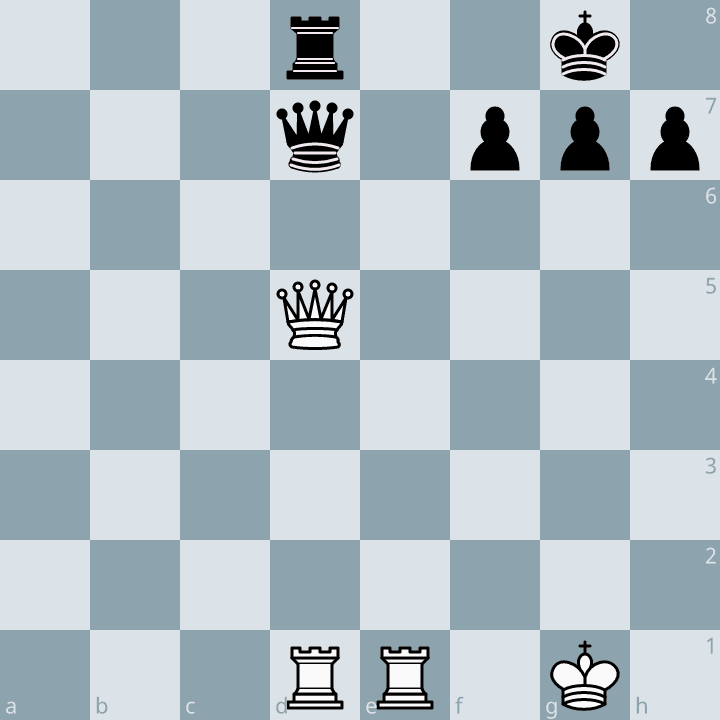
1.Qxd7! captures the queen. The tempting reply 1…Rxd7 fails to 2.Re8#. Once the black rook leaves d8, it can no longer prevent White’s rook from entering the eighth rank.
After Re8, Black’s king cannot leave through f7, g7 or h7 because its own pawns occupy those squares. The white rook controls f8 and h8. The black rook on d7 cannot capture the checking rook or interpose on f8, so the check is mate.
Black is not forced to recapture. Declining Rxd7 avoids this particular mate, but Black has still lost the queen. The lesson is that the rook cannot defend the queen and preserve the back rank simultaneously.
This explains why a defended piece is not always safe to leave under attack. Count what the defender must protect after moving, not only how many pieces currently defend the target. Read the guide to weak back ranks for the mating mechanism behind the example.
🛡️ How to defend against an overload
Apply the same scan to your own pieces. When one rook or queen is responsible for several important targets, look for a way to remove a duty before the opponent creates a forcing demand.
You might move an exposed queen, add a second defender, exchange an attacking piece or create a safe escape square for the king. The correct choice depends on the tactical details; a pawn move intended to create breathing room can itself lose time or expose a new weakness.
In the diagram, the absence of a king escape is what makes the rook’s back-rank duty decisive. As a training experiment, move Black’s h-pawn to h6 and replay Qxd7 Rxd7 Re8+. Black now has Kh7 available, so the same final move is no longer mate.
That experiment does not claim every other detail of the position is harmless. It isolates one relationship: changing the king’s escape squares can remove the specific mating consequence that made the rook overloaded.
🧠 Practise recognising incompatible defensive jobs
Choose a small group of tactical positions and spend the first minute naming defenders rather than searching for moves. Record each important piece and the material or squares it protects.
Next, choose one possible overloaded piece and calculate a forcing demand. Write the opponent’s strongest reply, including a refusal to capture. Compare the result with a normal developing or improving move.
After checking the answer, explain why the defence fails in one sentence. “The rook must stay on the back rank” is a usable lesson. “The queen sacrifice works” tells you too little to recognise the pattern elsewhere.
Use the Lichess practice area for additional tactical work, then review positions from your own games without a theme label. Include examples where a busy defender is not overloaded because one move solves both threats.
💬 Common questions about overloaded pieces
Can a pawn be overloaded?
Yes. A pawn can protect two important squares or pieces, and a capture may force it to abandon one duty. Check what it stops defending after moving, while remembering that another piece may be able to take over.
Is overloading the same as deflection?
They are related but describe different things. Overloading is the conflict between defensive jobs. Deflection is a way to draw a defender away from an important duty. A deflection can exploit an overload, but not every deflection requires two simultaneous responsibilities.
The takeaway: find the overloaded piece in chess by studying its duties, then test a forcing move. The combination is convincing only when the defender cannot preserve both responsibilities or create a stronger threat of its own.

You may also like

How to Study a Chess Course: 5 Easy Steps

How To Play Gambit Positions In Chess?