

Basic Checkmates in Chess: 5 Easy Steps to Confident Wins
Winning a queen or reaching a rook ending is only useful if you can finish the game. Basic checkmates in chess give you a dependable way to convert a large advantage without endless checks, unnecessary clock pressure or an accidental stalemate.
Start with three finishes: king and queen against king, king and rook against king, and the two-rook ladder. Each uses a different arrangement of pieces, but the main question stays the same: which squares can the defending king still use?
This guide combines a five-step thinking method with board exercises and a short practice routine. Work through the diagrams on a real board or analysis board. Finding the move yourself is more useful than recognising the answer after reading it.
Table of Contents
🎯 Basic checkmates in chess: five steps for a reliable finish
Do not begin by hunting for checks. Begin by deciding where you want the enemy king to end up. Your moves should make that destination increasingly difficult to avoid.
1. Restrict the defending king
A rook can build a barrier along a rank or file. A queen can cut off both directions at once. Place the piece where it removes useful squares without allowing the king to capture it. Think of the available area as a box that you gradually make smaller.
2. Bring in the missing helper
In king-and-rook checkmates, your king is essential. In standard queen-mating technique, bringing the king closer also makes the finish straightforward. With two rooks, one rook can supply the restricting line while the other checks, so your king usually does not need to join the attack.
3. Reduce space without losing coordination
After every enemy king move, ask whether you can safely tighten the box. Sometimes the correct move is a quiet king move or a rook retreat. A smaller box is not an improvement if the defender can capture your only mating piece.
4. Verify the final mating net
Before announcing mate, check three possible answers: capture the checking piece, block the check, or move the king. In these lone-king positions, blocking is unavailable, but the other two possibilities still matter. A piece placed next to the enemy king needs protection.
5. Repeat from a different starting position
Memorising one demonstration does not prove you know the method. Move the kings and mating pieces to a new legal arrangement, switch colours, and try again. Your explanation should still work even though the exact squares have changed.
👑 King and queen checkmate: shrink the box carefully
The queen makes basic checkmates in chess feel easy because she controls so many squares. That strength creates the main danger too: she can take away every legal move without actually giving check.
Start by using a safe queen move to restrict the king towards an edge. You do not need a check on every turn. Once the king is confined, bring your own king closer while preserving at least one legal reply whenever the defender is not in check.
Near the edge, stop and identify the final picture. Your king can protect the queen or control the escape squares beside the defender. Only then should you place the queen on the mating square.
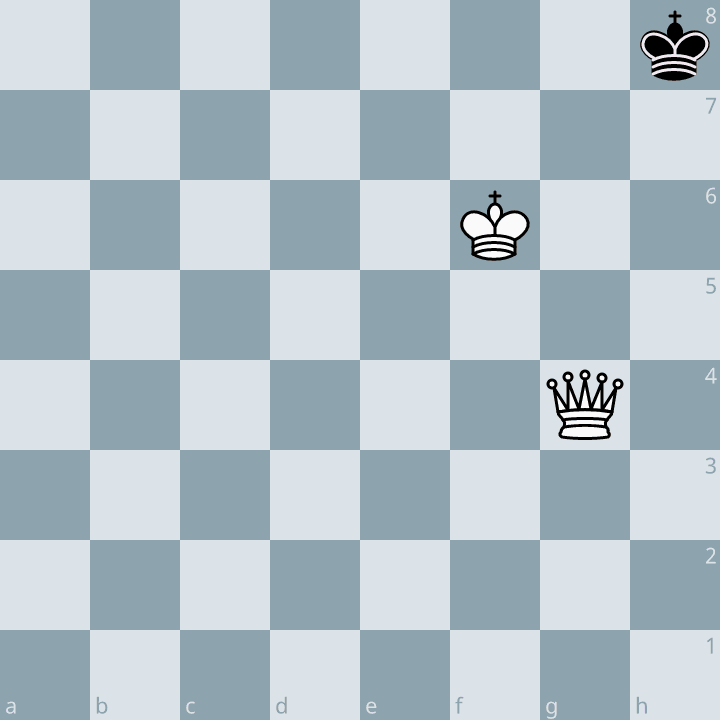
Answer: 1.Qg7#. The queen checks h8 along the diagonal, covers g8 along the file and controls h7 along the rank. White’s king on f6 protects g7. Black has no legal king move and cannot capture the queen.
Now compare that with 1.Qg6? in the same position. Black is not in check, but g8, g7 and h7 are all controlled by the queen. There are no other black pieces to move. That is stalemate, not checkmate. One square changes the result from a win to a draw.
This comparison is worth repeating before you practise longer sequences. Rather than remembering that the queen belongs near a corner, learn to check the defender’s legal moves. It is the difference between recognising a pattern and understanding it.
🏰 King and rook checkmate: let your king do its job
A rook controls fewer directions than a queen, so your king must help remove escape squares. Use the rook to cut off a rank or file, then approach with your king. Avoid chasing the defender around an unrestricted board with random checks.
When the defending king approaches the rook, move the rook safely away while keeping the barrier useful. A long lateral move often preserves the restriction better than a nervous check. The purpose is to maintain control, not to keep the pieces close together at all costs.
To push the king backwards, coordinate your king with the line of the rook. In the familiar final pattern, your king controls the squares immediately in front of the defending king and the rook checks along the edge. The diagram shows exactly how those jobs fit together.
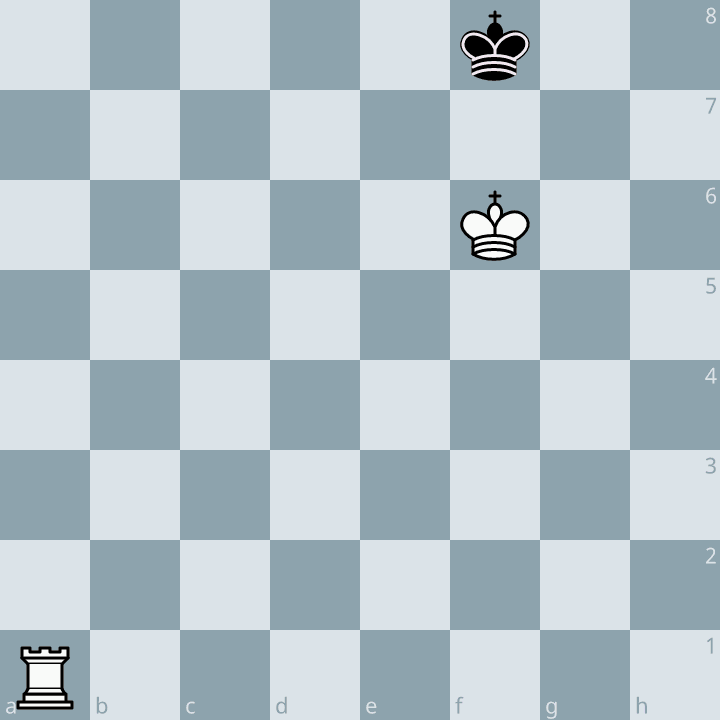
Answer: 1.Ra8#. The rook checks along the eighth rank. White’s king on f6 controls e7, f7 and g7, so Black cannot step off that rank. The king cannot reach the rook on a8, and there is no piece available to block the check.
Notice that the rook does not have to stand beside your king. Their cooperation comes from the squares they control. This is an important lesson for basic checkmates in chess: coordinated pieces can work together from opposite ends of the board.
For practice, move Black’s king away from the edge and rebuild this kind of finish. Name the barrier before each move. If the defender escapes towards the centre, identify which restriction you abandoned rather than restarting without reviewing the mistake.
♟️ Two-rook ladder mate: alternate the jobs
In the ladder mate, the rooks take turns. One controls the rank that the enemy king would like to return to; the other gives a check from the next rank. After the king retreats, the roles switch.
The two-rook version of basic checkmates in chess is often the easiest to understand because the division of work is visible. One rook builds the barrier and the other pushes. Your king can remain far from the action.
The important exception is proximity. If the enemy king gets close enough to attack a rook, do not continue the ladder automatically. Move that rook to a safer file, preserve the restricting line, and resume only when both rooks are secure.
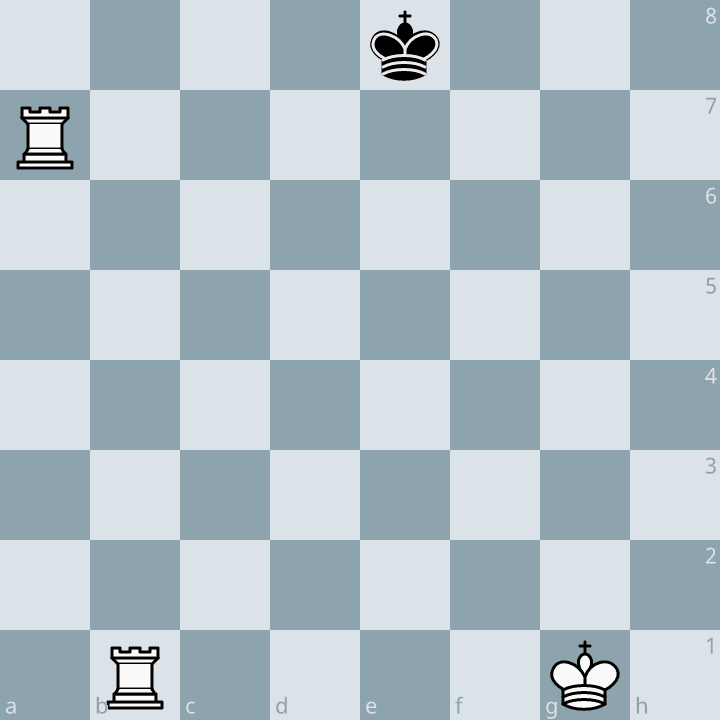
Answer: 1.Rb8#. The rook on b8 gives check along the eighth rank. The rook on a7 covers d7, e7 and f7, preventing Black’s king from stepping forward. White’s king on g1 does not participate in the mating net.
After solving, move the rooks onto different files and reconstruct the same arrangement. Then practise a longer version with the defending king in the centre. Before every check, point to the rook that prevents the king from returning.
⚠️ Avoid stalemate, exposed pieces and wasted moves
The final phase should become simpler, not more frantic. Use a short safety scan before moving: is my piece safe, is the defender in check, and what legal moves remain?
Do not confuse restriction with checkmate. A king with no legal moves is checkmated only when it is also in check. Against a lone king, a non-checking move that removes its last legal square ends the game in stalemate.
Do not give checks that release the king. Before moving a rook or queen, compare the defender’s available area before and after the move. If your check opens an escape route towards the centre, improving your king may be more useful.
Do not leave mating material undefended within reach. The enemy king can capture an unprotected rook or queen if the destination is not attacked. Check protection rather than assuming a valuable piece is safe because it is delivering check.
The FIDE Laws of Chess define checkmate and stalemate in Articles 5.1.1 and 5.2.1. For practical training, the useful habit is to verify the position before moving, not to rely on an opponent to point out the result afterwards.
⏱️ A 15-minute routine for basic checkmates in chess
Use this as an example session, not a mandatory schedule. Choose legal positions in which your mating material cannot simply be captured, and begin without a clock if you are still learning the method.
Minutes 1–3: recognise the finish. Solve the three diagrams above. For each answer, explain how every escape square is covered. Then set up the queen stalemate example and explain why it is different.
Minutes 4–8: build the position. Practise queen-and-king or rook-and-king mate from an unfamiliar setup. Before every move, state its job: restrict, approach, maintain the barrier, or deliver mate. Stop when your explanation becomes unclear and inspect the board again.
Minutes 9–12: change the geometry. Switch colours or choose a different edge. With two rooks, deliberately place the defending king nearer to one rook so you have to find a safe sideways move instead of repeating the same ladder.
Minutes 13–15: review one error. Record the first unnecessary check, lost barrier or stalemate danger. Replay from that moment and choose a better move. A precise correction gives the next session a purpose.
The Lichess practice section offers basic checkmate exercises on a digital board. The diagrams in this guide were rendered using Lichess. Once the methods are reliable, practise with a comfortable clock and reduce the time gradually.
Connect these finishes with your games by studying how to convert an extra pawn and how to exploit a weak back rank. The first helps you reach winning material; the second shows how mating patterns create threats before the endgame.
💬 Basic checkmates in chess: common questions
Which checkmate should a beginner learn first?
The two-rook ladder is a clear introduction to restriction. Follow it with queen-and-king mate and rook-and-king mate. Study all three: the easiest demonstration is not necessarily the finish that will occur in your next game.
Can a queen finish without help from the king?
A queen can restrict a lone king on her own, but bringing your king closer is the dependable method for completing this ending. Do not spend the whole game giving queen checks while leaving your king uninvolved.
Should I learn two-bishop and bishop-and-knight mates now?
Add the two-bishop mate once the main three finishes are comfortable. Bishop-and-knight mate is a more demanding technique and can be a later project. Prioritise accurate basics before spending most of your study time on a specialised ending.
How do I know the method is reliable?
Test it from unfamiliar legal positions, with either colour and against different king replies. You should be able to describe the restriction, keep your pieces safe and identify the final mate without guessing. Speed comes after that understanding.
The takeaway: basic checkmates in chess become manageable when every piece has a clear job. Restrict the king, coordinate your helpers, check for stalemate and finish with a mating net you can explain.

You may also like

How To Practice Blindfold Chess?

How To Break Through A Chess Plateau?